
How to Photograph the Milky Way
A Practical Field Guide to Landscape Astrophotography

"Night on the Savanna"
From Masaai Mara, Kenya, February 2023.
1. Introduction
Landscape astrophotography has fascinated me for well over a decade. Like many photographers, I was initially drawn to the spectacle of the Milky Way itself. Over time, however, I realised that the photographs I valued most were rarely the ones with the brightest stars or the brightest colours. They were the images where the landscape and the night sky came together to tell a story.
That shift changed the way I approach astrophotography.
Today, I spend far more time planning than I do adjusting camera settings. I think about moon phases, weather forecasts, foregrounds and composition long before I mount my camera on a tripod. More often than not, the success of a night photography session has already been decided before darkness falls.
This guide is built around that philosophy.
Rather than focusing on camera settings alone, we'll explore the complete process of planning and creating a successful Milky Way photograph. From understanding the movement of the night sky and choosing the right location to composing the image, selecting appropriate equipment and avoiding some of the most common mistakes photographers make.
Although many of the examples are drawn from landscape photography, the principles discussed here apply whether you're photographing along the Norwegian coastline, beneath the mountains of the Alps or under the remarkably dark skies of Namibia. Good astrophotography is built on the same foundations regardless of where you are.
Throughout this guide I've drawn on my own experience as a landscape photographer and astrophotographer. Over the past decade I`ve photographed the Milky Way in environments rangning from the Norwegian coastline to the Italian Alps and the African savannah. I am also relying on educational material from photographers whose work I respect, astronomy resources and published material. Wherever practical recommendations are based on specific sources rather than my own experience, those sources are acknowledged throughout the text.
My hope is that this guide will help you spend less time wondering which settings to use and more time experiencing the quiet moments that make night photography so rewarding. Because in the end, the best Milky Way photographs are rarely created by chance. They're created through careful preparation, patience and a willingness to let the landscape surprise you.

"Majestic Sights"
Olde Mountains, The Dolomites, Italy
October 2022
This photograph was never really about the Milky Way.
It was about waiting for everything to come together: the last traces of twilight, a clear autumn sky, the position of the Galactic Core and a foreground that could support the night sky rather than compete with it.
By the time I pressed the shutter, most of the important decisions had already been made. The image wasn't created by chance. It was the result of careful planning and patience.
That philosophy forms the foundation of this guide.
2. Understanding the Milky Way
Before planning a night photography session, it helps to understand what you're actually photographing. Many photographers use the term Milky Way as if it refers to a single object in the sky. In reality, the Milky Way is our home galaxy, a vast collection of hundreds of billions of stars, gas and dust stretching across roughly 100,000 light-years. Because we observe the Milky Way from inside the galaxy, it appears as a luminous band stretching across the night sky rather than a spiral shape often shown in astronomy books.
For landscape photographers, one region receives far more attention than any other: the bright central region of the Milky Way, commonly called the Milky Way Core. Near its centre lies the Galctic Center, in the direction of Sagittarius. This bright, colourful section contains dense star fields, dark dust lanes and glowing nebulae that create the dramatic structures seen in many landscape astrophotographs. When photographers talk about "shooting the Milky Way", this is usually the part they are referring to.
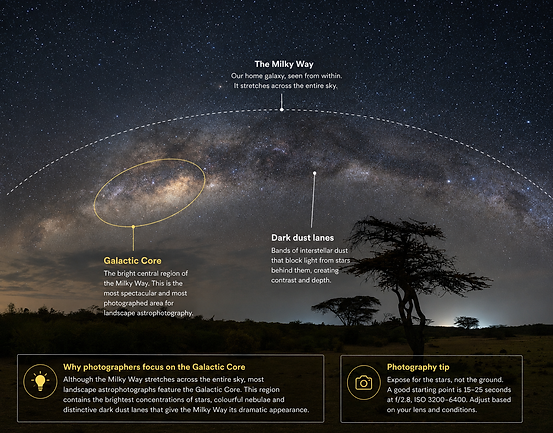
Illustration 1:
The Milky Way and the Galactic Centre
The Milky Way stretches across the entire night sky, but landscape photographers usually compose their images around the Galactic Centre.
This region contains the brightest star clouds and the most prominent dark dust lanes, making it the most visually striking part of our galaxy.
The position of the galactic centre in the night sky changes throughout the year as Earth orbits the Sun. Because of that orbit, different parts of the night sky become visible during different seasons. In the northern hemisphere, the Galactic Centre is typically visible from late winter until early autumn, while the best opportunities for photography usually occur between February and October, depending on latitude. During part of the year, the Galactic Center is not above the horizon during the hours of darkness, making it impossible to photograph regardless of camera settings.
Understanding this seasonal movement is one of the first steps in successful planning.
Did You Know?
The light from many of the stars visible in a Milky Way photograph began its journey long before humans invented the camera. Some has travelled thousands of years before reaching your sensor.
For photographers travelling between hemispheres, another important difference becomes apparent. In the southern hemisphere, the Galactic Centre climbs much higher above the horizon than it does in most parts of Europe or North America. This provides longer shooting windows and allows photographers to capture the Milky Way in positions that are simply impossible from northern latitudes. It is one of the reasons destinations such as Namibia, Chile and New Zealand have become so popular among astrophotographers.
Illustration 2. The same galaxy, seen from different latitudes
These pictures show the position of the Galactic Centre at about the same time of year from southern Norway (left) and Namibia (right). The lower latitude in Namibia allows the Galactic Center to climb much higher above the horizon, providing far greater compositional freedom. During the southern winter, this also coincides with long, dark nights and excellent opportunities for Milky Way photography. Notice how differently the Milky Way is oriented in these two examples. From southern Norway the Galactic Center remains low, while from Namibia it can climb much higher into the sky.

Shot in Southern Norway in August
Photo: Frank Otto Pedersen

Shot in Namibia in July
Photo: Laura Oppelt
Fortunately, you don't need to memorise star charts to take advantage of this knowledge. Planning tools such as PhotoPills and Stellarium calculate the exact position of the Milky Way for any location and date. Understanding the basic movement of the night sky simply helps you use these tools with greater confidence.
In the next chapters we'll use PhotoPills to plan a complete Milky Way shoot. From choosing a date to placing the Galactic Centre exactly where you want it in the composition.
3. Planning Your Milky Way Shoot

Tre Cime di Lavaredo and the Milky Way. Shot on July 1, 2016. Carefully planned before arrival.
Meet the Planner
How do you know exactly where the Milky Way will appear?
Images like the one above are planned long before I leave home. Today, tools such as PhotoPills allow us to predict where the Galactic Centre will appear, how high it will climb, and when darkness and moonlight create the best conditions for photography.
In this chapter we'll use PhotoPills to plan a Milky Way photograph from start to finish.
At first glance, the Planner can seem overwhelming. Coloured lines, circles, icons and graphs all compete for your attention. The good news is that you don't need to understand everything to start planning successful Milky Way photographs.
Throughout this guide, we'll focus on just a handful of features that you'll use again and again. Once you understand these, the rest of PhotoPills becomes much easier to navigate.
Everything starts with one simple element:

The red pin

Illustration 3: The Planner in PhotoPills
The red pin marks the location where your camera will be placed.
The red pin tells PhotoPills where you're planning to photograph. Combined with the selected date and time, the app can calculate the position of the Sun, Moon and Milky Way for that exact location. Move it to a mountain pass in the Dolomites, a beach in Norway or a desert in Namibia, and the app instantly recalculates the position of the Sun, Moon and Milky Way for that exact location.
This means you can plan a photograph weeks or even months before leaving home. Instead of arriving and hoping the Milky Way is in the right place, you already know where it will appear.
For that reason, placing the pin accurately is always the first step when planning a Milky Way photograph.
Photography Tip
Zoom in on the map before placing the pin. A difference of just a few hundred metres can noticeably change the relationship between the Milky Way and your foreground.
Choosing the Date and Time

Result in the field

The Milky Way
Tre Cime di Lavaredo, Italy
Planned in PhotoPills using the date and time shown on the left (1 July 2016, 00:04). The Galactic Centre appears directly above the peaks, exactly as predicted.
Changing the Date
Tap "More" and select "Date". Leave "Time zone" set to Autodetect.
Photography Tip: Choose the date first, then fine-tune the time. The date determines the seasonal position of the Milky Way, while the time determines where it will be at that particular moment during the night.
Once you've chosen your location, the next step is deciding when to photograph.
PhotoPills calculates the position of the Sun, Moon and Milky Way from three pieces of information: your location, the date and the time. Change either the date or the time, and the sky updates instantly. For this example, I've set the Planner to 1 July 2016 at 00:04, matching the conditions used for the photograph at Tre Cime di Lavaredo.
Even if you return to the same viewpoint, the Milky Way will appear in a different position as the the Earth orbits the Sun. Once you've chosen the right date, adjusting the time lets you to place the Galactic Centre exactly where you want it within the composition.
Visibility
Once you've chosen the date and time, there's one more thing to check before heading into the field: Visibility GC.
This panel tells you exactly when the Galactic Centre is above the horizon. In this example, it becomes visible at 23:55 and remains above the horizon until 02:34. Remember that visibility doesn't necessarily mean ideal conditions. When the Galactic Centre first appears, it is still low above the horizon. Waiting another hour often places it higher in the sky, giving a cleaner view and more flexibility when composing your photograph.
Visibility also depends on your latitude. Here in southern Norway, the Galactic Centre never rises high above the horizon, giving us only a very limited opportunity to photograph it. The farther south you travel, the longer it remains visible and the higher it climbs in the sky.
Direction Lines
Now that we have that covered, t's time to answer another important question:
Where will the Milky Way actually appear?
This is where the direction lines become invaluable.
The dotted white arch represents the position and orientation of the Milky Way relative to your chosen location. As you move the timeline forward or backward, the line rotates across the map, allowing you to see exactly how the Milky Way will be oriented at any given time.
The orientation of the Milky Way changes both through the night and through the season. Earlier in the Milky Way season, photographers in the Northern Hemisphere can often photograph it as a broad arch across the sky. Later in the season, the Galactic Center is often seen in a more upright or diagonal position during the hours of darkness. This can make later-season conditions particularly useful when you want the Milky Way to rise above a foreground subject, as in the Tre Cime example shown earlier. Understanding these changes makes it much easier to choose a date and time that suits the composition you have in mind.
Photography Tip
Think about your composition before choosing your shooting date.
If your goal is a full Milky Way panorama, plan your trip during spring or early summer. For a more upright Milky Way rising above your foreground, later summer often provides better opportunities.
Philosofical corner
Keeping it Real?

Oksøy Lighthouse, Norway.
Planned months in advance so the Milky Way would appear directly behind the lighthouse.
What does real mean in landscape astrophotography?
Every night photograph involves some degree of interpretation. We choose an exposure, adjust colour and contrast, reduce noise, and sometimes combine several exposures to overcome the limitations of the camera. When I use a star tracker, for example, the sky and foreground may not even have been photographed at exactly the same moment. As the Earth rotates, their relationship changes slightly, and aligning the tracked sky with the landscape inevitably involves some judgement.
So I don't pretend that my photographs are a perfectly objective record of a fraction of a second. They aren't.
What matters to me is something slightly different: I want the photograph to remain faithful to the experience and to what was
physically possible at that location.
I don't replace a dull sky with a more dramatic one from another night, move the Milky Way to the opposite side of a mountain, or combine a landscape in Norway with a sky photographed somewhere else. If I blend exposures, my intention is to reconstruct as faithfully as I can the scene I was there to photograph.
There is inevitably some interpretation involved, and another photographer may draw the line somewhere else. This is simply where I draw mine.
The photograph of Oksøy Lighthouse is a good example. I returned to the location several times during the summer of 2017, looking for an angle and a time when the Milky Way would rise behind the lighthouse. The satisfaction wasn't simply in producing the final image. It was knowing that the relationship between the lighthouse and the night sky was something I had found, planned for and experienced.
For me, that's what “keeping it real” means.
Bringing It All Together
By now, you know the four pieces of information I look at before planning every Milky Way photograph:
-
Approximately where will my camera stand?
-
Will the Galactic Core be visible?
-
When will it appear?
-
In which direction will the Milky Way stretch across the sky?
Once those questions are answered, the planning becomes much less about the app itself and much more about photography. The next step is choosing a composition that works with the sky rather than against it.
4. Composition
Planning tells you where the Milky Way will appear. Composition determines whether that information becomes a compelling photograph. One of the most common misconceptions about landscape astrophotography, in my view, is that the Milky Way itself is the subject. In reality, the night sky is only one part of the composition. The landscape remains just as important as it is during the day, and the strongest images are usually those where neither element dominates the other.
When I arrive at a location, I rarely begin by looking at the sky. Instead, I spend time exploring the foreground. I look for shapes, leading lines and visual balance, asking myself how the Milky Way might eventually interact with the landscape rather than simply appear above it. Adding the Milky Way rarely solves a problem. The night sky can strengthen a composition, but it cannot rescue a weak foreground. You might say that the most successful Milky Way photographs are rarely about the sky alone. Instead, they tell the story of a relationship between the landscape and the stars. So when planning a composition, I don't ask myself, "Where can I fit the Milky Way?" Instead, I ask:
How can the Milky Way strengthen this landscape?
That small change in perspective often leads to a very different photograph.
Example 1: From Southern Norway, April 2020

Finding the Relationship
A successful Milky Way photograph isn't simply about placing the Galactic Core somewhere in the sky. It's about finding a relationship between the landscape and the stars.
In this scene, I wasn't looking for the largest foreground element. Instead, I was drawn to the small white flowers growing between the rocks. They provide a natural starting point for the eye before it travels through the rocky foreground and continues upwards into the Milky Way.
The dark rocks create weight and texture, while the flowers introduce a delicate contrast that balances the image. The Milky Way isn't competing with the foreground - it completes it.
Sometimes the answer to the question above is obvious. The Milky Way may rise behind a lighthouse, frame a mountain peak, or follow the curve of a valley. At other times the relationship is much more subtle. A diagonal band of stars can echo the shape of a ridgeline, balance the weight of a foreground subject, or simply lead the viewer's eye deeper into the scene.
This is where PhotoPills becomes more than a planning tool. Rather than forcing the landscape to fit the sky, it allows you to explore different dates and times until the sky naturally complements the composition you already have in mind.
I've found that moving the camera only a few metres, changing my focal length, or waiting another thirty minutes creates a much stronger connection between the landscape and the Milky Way. Those small adjustments are often the difference between a photograph where the sky feels added on, and one where every element belongs together.
Ultimately, I don't want people to notice the Milky Way first. I want them to experience the photograph as a whole, with the landscape and the night sky supporting one another rather than competing for attention.
Example 2. From Southern Norway, August 2021

22:45 - The composition is there, but the Milky Way has not yet reached the right position.

00:15 - About 90 minutes later, Earth's rotation has caused the Galactic Center to appear in a different position in the sky, bringing it into the composition.
Waiting for the Right Moment
One misconceptions about Milky Way photography is that the sky somehow has to fit the landscape immediately.
When I arrived at this location, the composition was already there, but the Milky Way wasn't. The Galactic Core was still hidden behind the rocks, leaving the scene without the balance I was looking for.
Instead of searching for another foreground or creating the composition later in software, I simply waited.
As the Earth rotated, the Milky Way gradually climbed into position until it aligned naturally with the rock formations. Nothing in the landscape changed. Only time did.
This is often one of the most overlooked aspects of landscape astrophotography. Sometimes the best compositional decision isn't to move the camera - it's to stay exactly where you are.
Beyond the Rules
Composition is one of the most discussed subjects in photography. Entire books have been written about the Rule of Thirds, leading lines, visual weight, triangles and countless other principles. Many of these ideas are valuable, especially when you're learning to see. They encourage you to pay attention to how different elements relate to one another within the frame.
Over the years, however, I've found myself thinking less and less about rules. Not because they are wrong, but because they are no longer where my compositions begin.
Instead, I usually ask myself a much simpler question.
What am I actually photographing?
Sometimes it's a lone tree. Sometimes it's a dramatic rock formation, a patch of flowers growing between the stones, or simply the quiet relationship between the landscape and the night sky. Once I've identified what truly interests me, the composition begins to form around that idea. Everything else is there to support it rather than compete with it.
As I've spent more time in the landscape, this process has become increasingly intuitive. I rarely stand there consciously analysing where every element should be placed. Instead, I move around the scene, adjust the tripod a little, perhaps wait for the sky to change, until something suddenly feels balanced. It's difficult to explain exactly why. The image simply feels right.
I suspect that's something experience teaches better than any rulebook. The more time you spend observing landscapes, the more your eye begins to recognise balance without needing to measure it. You start responding less to diagrams and more to relationships - between foreground and background, between light and shadow, between the landscape and the sky above it.
For me, that's ultimately what composition is about. Not arranging objects according to a formula, but creating an image in which every element belongs. When the landscape, the Milky Way and the feeling that first drew me to the scene all point in the same direction, the photograph feels complete.
5. Working in the Field

Romsdalen, 2019
The work usually begins long before darkness falls. By the time the Galactic Core appears, I hope to have explored the location, settled on a composition, checked my focus and decided exactly where the camera will stand. If the conditions allow it, I may also have photographed the foreground while there is still some light in the sky.
I don't always manage it. Nor does everything always go according to plan. The point of preparation isn't to remove uncertainty - landscape photography will never allow that. It's to remove the uncertainty I can remove before darkness arrives.
A cloud bank may appear on the horizon. The wind may pick up. Haze may soften a sky that looked perfectly clear in the forecast. And sometimes a composition that seemed convincing on a map or during scouting simply doesn't work once I'm standing there. Planning gives me a starting point, but experience teaches me when to follow the plan, when to adapt and when it's better simply to wait.
That preparation has changed the way I experience a night in the field. Instead of spending the darkest hours searching for compositions or working through camera menus, I can pay attention to what is actually happening around me. As daylight fades and the stars begin to appear, my attention shifts from finding the photograph to recognising the moment when everything comes together.
I've found that each stage of the evening has its own purpose. The hours before sunset are often spent exploring the landscape, looking at foregrounds and testing compositions. Around blue hour, there may be an opportunity to photograph the foreground while enough natural light remains to reveal detail. Later, as darkness takes over, the work becomes quieter: refine the composition, check focus, watch the conditions and wait for the sky. And that waiting is part of the experience.
There is something quite different about watching a photograph you planned weeks or months earlier slowly become possible in front of you. The Milky Way begins to emerge, the landscape disappears into darkness, and eventually the sky reaches the relationship with the foreground that you had imagined. Sometimes the conditions cooperate. Sometimes they don't.
Planning doesn't guarantee the photograph. It simply gives you a better chance of being ready when the photograph presents itself.
The following sections describe the workflow I've gradually developed over more than a decade of photographing the night sky. It's not the only way to work, and I still adapt it to the location and conditions. But it allows me to spend less time solving avoidable problems in the dark – and more time paying attention to the reason I went out there in the first place.
Example 3. Foggy Conditions and the Milky Way

Not everything can be planned
This evening began under a clear, star-filled sky, with conditions that seemed almost ideal for photographing the Milky Way. But as the night progressed, mist slowly began to form over the landscape and drift across the scene. No planning app or weather forecast could tell me exactly how it would develop.
Rather than ending the session, the changing conditions created a very different photograph from the one I had imagined. The mist softened the landscape, caught the light near the horizon and gave the night sky an atmosphere I could never have planned in advance.
Planning had put me in the right place at the right time. The rest was a matter of recognising what the night was giving me.
6. Equipment for Milky Way Photography
It is easy to get the impression that astrophotography requires specialised equipment. It doesn't. A modern camera, a reasonably fast lens and a sturdy tripod are enough to create excellent Milky Way photographs. Better equipment can make certain things easier, but it cannot replace a dark sky, careful planning or a strong composition. Over the years, my equipment has changed considerably. The basic requirements haven't.
The Camera
Almost any modern interchangeable-lens camera can be used to photograph the Milky Way. What matters most is having manual control over aperture, shutter speed and ISO, and the ability to record RAW files. Larger sensors can offer advantages in low light, but sensor size alone doesn't determine whether a camera is suitable for astrophotography. Lens choice, exposure, processing and the conditions under which you're photographing all contribute to the final result.
There are, however, a few practical features I particularly appreciate at night: a screen that is easy to use in awkward positions, good battery life, useful magnification for checking focus and controls that I can operate without spending too much time in menus.
None of these will improve the composition. They simply make working in darkness easier.
The Lens
If I had to prioritise one piece of equipment for untracked Milky Way photography, I would pay particular attention to the lens.
A wide-angle lens allows you to include both the landscape and a large part of the night sky, while a wide maximum aperture helps you collect more light during the relatively short exposures required to keep the stars reasonably round. This is why lenses somewhere in the wide-angle range with maximum apertures around f/1.4 to f/2.8 are so commonly used for landscape astrophotography.
But faster isn't automatically better.
As we saw earlier, some lenses show considerable coma, astigmatism or softness toward the corners when used wide open. A lens that performs well across the frame at f/2 may be more useful in practice than a faster lens that needs to be stopped down considerably before the stars look acceptable.
Focal length also changes more than the field of view. The longer the lens, the sooner the movement of the stars becomes visible during an untracked exposure. A wider lens therefore usually allows a longer exposure before star trailing becomes objectionable.
For me, choosing a lens is always a compromise between field of view, aperture, image quality and the composition I want to make.
The Tripod
The tripod may be the least exciting piece of equipment in the bag, but at night it becomes essential. Exposure times measured in seconds require the camera to remain completely still. The tripod doesn't need to be enormous or expensive, but it does need to be stable enough for the camera and lens you're using. Wind changes the equation. A tripod that feels perfectly solid on a calm evening may vibrate noticeably during a long exposure on an exposed coastline or mountain ridge.
I try to extend the thickest leg sections first, avoid raising the centre column unnecessarily and place the tripod where the ground itself is stable. On soft sand, snow or vegetation, simply moving it half a metre can sometimes make more difference than using a heavier tripod.
And once the exposure begins, I leave it alone.
A Few Small Things That Matter
Some of the most useful equipment in my bag costs very little.
- A headlamp with a red-light option helps me move around without completely destroying my night vision.
- Spare batteries are important because long exposures, cold temperatures and extensive use of the rear screen can drain them surprisingly quickly.
- A lens cloth is essential when condensation, sea spray or moisture begins collecting on the front element.
- A remote release, although a two-second self-timer works perfectly well for most situations.
And then there are the things that have nothing to do with the camera:
- warm clothing, proper footwear, water and whatever equipment is necessary to move safely through the landscape after dark.
The photograph isn't worth getting injured for.
What About a Star Tracker?
A star tracker is one of the few pieces of specialised equipment that can fundamentally change how you photograph the night sky.
Instead of remaining stationary, the tracker slowly rotates the camera to compensate for the Earth's rotation. This allows much longer exposures of the stars without turning them into trails, which means considerably more light can be collected from the night sky.
But there is a catch.
While the tracker follows the stars, the landscape moves relative to the camera. For landscape astrophotography, this often means making one tracked exposure for the sky and a separate untracked exposure for the foreground, then combining them later.
A tracker therefore isn't simply a better tripod. It changes both the way you photograph and the way you process the image.
For much of this guide, I concentrate on untracked photography because it is the simplest place to begin and requires very little specialised equipment. Later, we'll look at when tracking becomes useful and what it allows us to do that a conventional exposure cannot.
Use What You Have
There will always be a camera with better high-ISO performance, a sharper lens or a lighter tripod.
Those differences are real. But they are rarely the reason a photograph succeeds.
If your camera allows manual exposure, your lens is reasonably wide and fast, and your tripod keeps everything still, you already have the basic equipment required to photograph the Milky Way.
Learn where your equipment struggles. Learn where it performs well. Then work within those limits.
Knowing your equipment in darkness is far more useful than owning equipment you haven't learned to use.
7. Camera Setup and Exposure
After all the planning, scouting and waiting, we finally arrive at the part of Milky Way photography that often gets the most attention: the camera settings.
When I first started photographing the night sky, I was looking for the same thing many beginners are looking for—a combination of aperture, shutter speed and ISO that would give me a properly exposed Milky Way. It would have been convenient if such a combination existed. It doesn't.
The right exposure depends on the camera and lens you're using, the amount of ambient light, how much movement you're willing to accept in the stars and, ultimately, what you're trying to achieve with the photograph. Rather than memorising a set of numbers, it is much more useful to understand what each setting is doing.
Start with the Aperture
For most untracked Milky Way photographs, I start with the lens at or close to its widest aperture. The reason is simple: there isn't much light available, and opening the aperture allows more of it to reach the sensor.
A fast lens is therefore useful, but the widest aperture isn't automatically the best aperture. Some lenses become noticeably softer toward the edges when used wide open, and stars are particularly unforgiving subjects. Coma and other optical aberrations can turn points of light near the corners into wings, streaks or irregular shapes.
Example 4. The Wide-Open Compromise


I drove 11 hours to make this photograph. It was the only area in Southern Norway with clear skies that particular weekend in September 2017. I used a Sigma 20mm f/1.4 Art lens and photographed the scene wide open at f/1.4 to gather as much light as possible.
The enlarged section on the right shows the compromise. Notice how much softer the stars become toward the corner of the frame. On a phone or at a small size, it's hardly noticeable. In a large print or on a large screen, however, the loss of sharpness becomes much more obvious.
This is a good example of why the widest aperture isn't always the best aperture. Opening the lens gathers more light, but sometimes stopping down slightly produces a better final image.
If your lens performs significantly better when stopped down slightly, the improvement in image quality may be worth the loss of light. This is something worth testing with your own equipment rather than assuming that the lowest f-number is always the correct choice.
For many of my photographs, however, gathering as much light as possible remains the priority. In those situations, I will happily accept some imperfections in the corners in exchange for a stronger exposure of the night sky.
Shutter Speed: How Much Star Movement Can You Accept?
Once the aperture is chosen, shutter speed becomes the next important decision. Because the Earth is rotating, the stars are constantly moving across the frame. Leave the shutter open long enough and they will no longer appear as points—they will begin to form short trails.
Example 5. When Stars Begin to Trail

Too long
The stars have begun to stretch into short trails as the Earth rotates during this 25 seconds exposure.

Shorter exposure
A shorter shutter speed at 15 seconds keeps the stars much closer to points of light.
The difference may be difficult to see on the camera screen, but becomes obvious when you zoom in. There is no single shutter speed that guarantees perfectly round stars - focal length, sensor resolution, where you point the camera and how large the photograph will be displayed all matter. Take a test exposure, zoom in, and decide how much movement you are willing to accept.
The familiar 500 Rule is often suggested as a way to calculate the longest usable exposure:
500 ÷ focal length = maximum shutter speed in seconds
On a 20mm lens, for example, that would suggest an exposure of about 25 seconds.
It's a useful concept, but I wouldn't treat it as a rule.
Modern high-resolution cameras can reveal star movement much more easily than older, lower-resolution sensors, and the result also depends on focal length, pixel size, where the stars are in the frame and how large the photograph will eventually be viewed. A 25-second exposure that looks perfectly acceptable on a phone may show obvious movement when examined closely on a large monitor or print.
PhotoPills includes a more sophisticated NPF Rule calculator that takes several of these factors into account and can provide a better starting point.
Figure 4. The NPF calculator in Photo Pills


To access the NPF calculator inside the PhotoPills app, go to Spot Stars and adjust the settings according to your camera gear.
I shoot with a 15-35 f2.8 Canon RF lens and a Canon R5 camera body. That gives me 33 seconds based on the 500 rule - which I never use. If I want perfect round shaped stars with my setup I am limited to 7,28 seconds. If I switch Accuracy to Default I get a 15 second exposure. That`s usually what I shoot at.
ISO Doesn't Capture More Light
ISO is probably the most misunderstood of the three settings.
Increasing ISO makes the image appear brighter, not because the sensor collects more light, but because the camera amplifies the signal produced by the light it has already captured. Aperture and shutter speed determine how much light reaches the sensor; ISO affects how that captured signal is handled by the camera.
Think of ISO a little like the gain control on an audio mixer. Turning up the gain makes a weak microphone signal stronger, but it doesn't make the microphone capture more sound. In much the same way, increasing ISO makes the camera's recorded signal brighter, but it doesn't make the sensor collect more light.
This distinction matters in Milky Way photography. If the sensor hasn't collected enough light in the first place, simply increasing ISO can't create detail that wasn't captured. That's why I normally choose aperture and shutter speed first: aperture determines how much light the lens can gather, while shutter speed determines how long I can collect it before star movement becomes a problem.
Once those two are established, I adjust ISO to give me a useful exposure. For an untracked Milky Way photograph, I will often end up somewhere around ISO 1600–6400, depending on the camera, lens and conditions. Those numbers aren't recommendations, but they are a realistic range for this kind of photography with many modern cameras.
High ISO is often blamed for noise, but the relationship isn't quite that simple. Much of the noise we associate with high-ISO night photographs comes from the fact that we're working with very little light to begin with. Different cameras also behave differently as ISO is increased.
So don't be afraid of higher ISO settings simply because you've been told that high ISO is bad. Collect as much useful light as you can with aperture and shutter speed first, then choose the ISO that works for your camera and the scene.
A Starting Point, Not a Recipe
If you're photographing the Milky Way for the first time, you still need somewhere to begin. With a full-frame camera and a fast wide-angle lens, something in the region of: f/2.8 · 15–20 seconds · ISO 3200 can be a reasonable starting point for an untracked exposure under a dark sky. But that's all it is - a starting point.
Take a photograph and inspect it. Check the stars for movement. Look at the histogram. Make sure important highlights aren't clipping. Check the corners of the frame and, most importantly, make sure the stars are actually in focus. Then adjust.
This is one of those areas where experience quickly becomes more useful than memorised settings. After a few nights under the stars, you'll begin to recognise what your particular camera and lens can tolerate—and what compromises you're willing to make.
What About White Balance?
If you're photographing in RAW, white balance isn't something I spend much time worrying about in the field. It can be adjusted later without the same penalty you would have when working with a JPEG. I still prefer the camera preview to look reasonably close to the atmosphere of the scene, however. A fixed white balance can also make a sequence of exposures easier to evaluate consistently than leaving the camera to change the colour temperature automatically from frame to frame.
There is no single correct Kelvin value for the Milky Way. Artificial light pollution, moonlight and atmospheric conditions can all change the colour of the scene. I would rather choose a neutral starting point and make the final judgement during processing than chase a supposedly perfect number in the dark.
Check the Photograph, Not Just the Settings
Before moving on, I always check the actual file. Zoom into a bright star and confirm focus. Look for movement. Check the corners. Examine the histogram rather than relying entirely on how bright the photograph looks on the rear screen—the display can be deceptive when your eyes have adapted to darkness.
And then look at the whole photograph again.
It's surprisingly easy to become so concerned with technically perfect stars that you stop paying attention to the image you spent all that time planning.
The settings are there to capture the photograph.
They aren't the photograph.
8. Focusing in the Dark
Exposure mistakes can often be corrected to some degree. Missed focus usually cannot.
Unfortunately, focusing on stars is also one of those things that feels far more difficult the first few times you try it. The autofocus system may struggle, the viewfinder is almost black, and what looks sharp on the rear screen can turn out to be disappointingly soft when you examine the photograph later.
The good news is that focusing at night becomes quite simple once you develop a routine.
Don't Trust the Infinity Mark
It is tempting to turn the focus ring to the infinity symbol and assume that the stars will be sharp. I don't.
On many modern lenses, the infinity mark is not a precise focusing reference. Some lenses can even focus slightly beyond infinity, while temperature changes and normal mechanical tolerances can alter the exact position of the focus ring. Instead, I focus on an actual star.
Start With a Bright Star
I normally switch the lens to manual focus and use Live View on the rear screen. Then I find one of the brightest stars in the sky and magnify the image as much as the camera allows.
At first, an out-of-focus star appears as a relatively large, soft point of light. As I slowly turn the focus ring, it becomes smaller and more concentrated.
I continue through the point that looks sharpest until the star begins to grow again, then carefully turn the ring back.
The goal is simple:
Make the star as small and well defined as possible.
If no suitable star is visible on the screen, a distant artificial light can sometimes provide a useful starting point. I can then return to the stars and fine-tune the focus.
Once I think the focus is correct, I take a test exposure.
Check the Photograph, Not Just Live View
This step is important.
I take an exposure, magnify the resulting photograph and inspect several stars. If they look soft, I make a tiny adjustment and try again.
Don't judge focus from the photograph at normal screen size. Slightly blurred stars can look perfectly acceptable when the whole image is squeezed onto a small display.
Zoom in.
At the same time, remember what we discussed about shutter speed. An elongated star isn't necessarily a focusing problem. If all the stars stretch in the same direction, you may simply be seeing movement caused by the Earth's rotation.
Learning to distinguish poor focus from star trailing saves a lot of frustration in the field.
Then Leave the Focus Alone
Once I have achieved good focus, I switch off autofocus if I haven't already done so and try not to touch the focus ring again.
This sounds obvious, but it is surprisingly easy to move it while changing filters, repositioning the camera or taking the camera in and out of a bag.
With some lenses, a small piece of tape can help prevent accidental movement. I also check focus occasionally during a long session, particularly after a significant temperature change or if I have moved the equipment.
A few seconds spent checking focus is considerably better than discovering the problem the following morning.
When the Foreground Is Close
Focusing on the stars solves only half the problem when the foreground is close to the camera.
A distant mountain may remain acceptably sharp when the lens is focused near infinity, particularly with a wide-angle lens. A flower, rock or other foreground subject only a metre or two from the camera is a different matter. In those situations, it may simply be impossible to keep both the nearby foreground and the stars acceptably sharp in a single exposure.
Example 6. Focus

In this picture you can clearly see how the closest foreground is out of focus. To make this image sharp from front to back, I would need to use focus stacking.
Enlarge to have a closer look.
Stopping the lens down increases depth of field, but at night that comes at a price: less light reaches the sensor. And even a small aperture cannot provide unlimited depth of field.
Rather than forcing one exposure to do everything, I will sometimes make separate exposures.
- One is focused on the stars.
- Another is focused on the foreground.
- If necessary, I may make several foreground exposures at different focus distances and combine them later using focus stacking.
The important point is that the camera remains in exactly the same position. I'm not replacing the landscape or moving elements around the frame. I'm recording the same composition while changing focus to overcome a limitation of depth of field.
Whether this is necessary depends entirely on the scene.
Don't Forget the Foreground
There is another useful habit here. After checking the stars at 100%, check the foreground as well. It is easy to become so preoccupied with perfect stars that you overlook a soft rock, tree or mountain that occupies half the photograph.
Ask yourself what actually needs to be sharp in the finished image.
Sometimes the answer is everything. Sometimes it isn't.
A Simple Focusing Routine
My basic routine in the field is therefore very simple:
-
Switch to manual focus.
-
Find a bright star.
-
Magnify it in Live View.
-
Adjust focus until the star is as small as possible.
-
Take a test exposure.
-
Zoom in and check the actual photograph.
-
Check the foreground.
-
Leave the focus ring alone unless something changes.
After a while, this becomes almost automatic.
Focusing in darkness shouldn't occupy much of the night. The aim is to establish reliable focus early, verify it occasionally, and then return your attention to the photograph.
Get the focus right, check it, and move on.
9. Capturing the Final Image
Once the composition, exposure and focus are in place, the remaining question is deceptively simple:
What do I actually need to photograph before I leave?
Sometimes the answer is a single exposure. At other times, the limitations of the camera, the lens or the available light mean that several exposures are required to create the photograph I have in mind.
The important thing is not to use more complicated techniques simply because they are available. Every additional exposure should solve a specific problem. It may help reduce noise in the night sky, keep a nearby foreground sharp, extend the field of view or record enough detail in a landscape that would otherwise disappear into darkness.
The technique should follow the photograph, not the other way around.
Start With a Single Exposure
Whenever possible, I begin by trying to make the photograph work in a single frame. There is something reassuring about knowing that the complete relationship between the landscape and the sky exists in one exposure. It also keeps the process simple. There are fewer opportunities to move the camera accidentally, change the focus or discover later that an important part of the scene was never recorded properly.
A single exposure can work particularly well when the foreground is relatively distant, the landscape does not require much detail, and there is enough natural or artificial light to give it some shape. Moonlight, twilight, distant towns or even reflected light from clouds may provide more illumination than is immediately obvious to the eye.
Before deciding that the foreground is too dark, I examine the RAW file rather than relying on the rear-screen preview. A photograph that appears almost black on the camera may contain considerably more information than expected. But a single exposure also has limits. A nearby foreground may fall outside the depth of field. Deep shadows may contain too little useful information. Increasing the exposure time may brighten the landscape, but it also causes the stars to trail. Raising ISO makes the recorded image brighter, but it cannot replace light that was never captured.
When those limitations begin to shape the photograph more than I want them to, I consider making additional exposures.
When One Exposure Isn’t Enough
Using more than one exposure does not necessarily mean changing the composition. The camera can remain in exactly the same position while I make different exposures for different technical purposes. I may change the focus, shutter speed or ISO, but the relationship between the landscape and the Milky Way remains the same. This distinction matters to me.
I am comfortable combining exposures made from the same camera position to overcome limitations in depth of field, noise or dynamic range. I am not interested in moving the Milky Way to a more convenient position or replacing the sky with one photographed somewhere else.
The final photograph may not represent a single exposure, but it should still represent the scene I stood in and the relationship between the landscape and the sky that existed there.
Photographing the Foreground
The foreground often requires a different approach from the stars.
A shutter speed of fifteen seconds may be long enough to reveal the Milky Way without excessive star movement, but it may not be long enough to record clean detail in a dark landscape. Because the foreground is not moving across the frame in the same way as the stars, I can expose it for considerably longer.
One option is to photograph the foreground during the same period as the night sky. Without changing the composition, I reduce the ISO and make a longer exposure of the landscape. Depending on the conditions, this may last for a minute or several minutes. The stars will trail during this exposure, but that does not matter if the file is intended only for the foreground.
This approach records the landscape under the light that was actually present during the night. It can work particularly well when there is some moonlight, distant artificial light or a faint glow remaining near the horizon.
In very dark conditions, however, even a long exposure may leave the foreground noisy and without useful colour or detail. This is one reason I sometimes photograph it during late blue hour, before the sky becomes completely dark.
The camera is placed in its final position while enough natural light remains to see the landscape clearly. I make the foreground exposure, leave the tripod untouched and wait for the Milky Way to move into the planned position.
A blue-hour foreground is not a single-moment representation of the scene. The foreground and the stars were photographed at different times. I do not think that automatically makes the method wrong, but it is important to understand what the technique does. Used carefully, it can create a natural transition between landscape and sky. Used without restraint, it can produce a foreground that looks like daylight beneath a midnight sky.
The foreground should still feel as though it belongs to the night.
Stacking the Night Sky
Another reason to make several exposures is to reduce noise in the Milky Way.
Instead of relying on one high-ISO photograph, I can make a sequence of identical exposures without moving the camera. The stars change position slightly between each frame because of the Earth’s rotation, but specialised software can align them before combining the files.
Random noise varies from one exposure to the next, while the stars and structures of the Milky Way remain consistent. When the images are aligned and averaged, much of that noise is reduced and the useful signal becomes clearer.
The process does not create light that was never captured. It makes better use of the light recorded across the complete sequence.
For stacking to work well, I try to make the exposures close together and avoid changing the focus, aperture, shutter speed or ISO. A short sequence may be enough to produce a noticeable improvement, although the ideal number depends on the camera, the conditions and how clean the final file needs to be.
For Mac users, a program called Starry Landscape Stacker makes this process relatively straightforward. It aligns the stars, separates the moving sky from the stationary landscape and combines the exposures into a cleaner image. Several simple tutorials are available online that demonstrate the complete workflow, so there is little reason to reproduce every step in this guide.
Stacking becomes more difficult when clouds are moving through the frame, vegetation is blowing in the wind or light conditions are changing quickly. It is another tool rather than a requirement. If a single exposure already gives me the result I need, I am happy to use it.
Using a Star Tracker
A star tracker approaches the same problem differently. Instead of making several short exposures, the tracker rotates the camera slowly to follow the movement of the stars. This allows a longer exposure of the sky without turning the stars into trails. More light reaches the sensor, revealing fainter detail and producing a cleaner file.
For photographs in which the Milky Way occupies a large part of the frame, the difference can be considerable. But while the tracker keeps the stars still, it causes the landscape to move relative to the camera. A tracked exposure cannot normally keep both the sky and foreground sharp. I therefore make one tracked exposure for the stars and a separate untracked exposure for the landscape.
This requires care. The tracker changes the camera’s position slightly during the sky exposure, and the boundary between mountains, trees or rocks and the night sky may become difficult to combine naturally. Longer lenses and complicated horizons make this particularly noticeable.
For that reason, I see a tracker as useful rather than essential. It can improve the technical quality of the sky, but it also adds equipment, setup time and another layer to the processing. Some photographs benefit from it. Others are better served by a simpler approach.
Photographing a Panorama
Sometimes the limitation is not light or noise, but the size of the scene. A single wide-angle frame may not be able to include the full curve of the Milky Way together with the landscape beneath it. In those situations, I photograph a sequence of overlapping frames and combine them later as a panorama. The basic principle is the same as in daylight photography. The camera rotates gradually across the scene, and each frame overlaps the previous one enough for the software to identify matching details.
At night, however, there is less room for error. The stars continue to move while the sequence is being made, and a foreground close to the camera can create parallax problems as the camera rotates. The tripod must be level, the exposure and white balance should remain consistent, and the sequence should be completed without unnecessary delay.
I normally photograph more of the scene than I think I will need. Panoramas often require cropping after the frames have been stitched, and a little extra space around the edges can prevent important parts of the composition from being lost.
As with stacking and tracking, a panorama should serve the image. The purpose is not to make the Milky Way appear larger or more dramatic than it was, but to record a field of view that could not be contained within a single frame.
A Practical Shooting Sequence
When a scene requires several exposures, the order in which I make them matters.
If the foreground will be photographed during blue hour, I establish the final composition before the light disappears. Once that exposure has been made, I avoid moving the tripod. I may need to wait several hours before the Milky Way reaches the planned position, so it is important to make sure the camera is secure and the composition is one I am willing to keep.
When the sky is ready, I check the focus again and begin with a complete untracked exposure. Even if I intend to use stacking or a tracker, I want at least one frame in which the entire scene has been recorded together.
I then make any additional sky exposures while the conditions remain stable. If I am stacking, I photograph the sequence without unnecessary pauses. If I am using a tracker, I make both the tracked sky exposure and an untracked reference frame before changing the composition.
Finally, I photograph any additional foreground exposures or focus distances that may be required.
There is no universal order that works for every location. Moonlight may be changing, clouds may be approaching, or the Milky Way may have only a short window in the right position. The purpose of a routine is not to make the process rigid. It is to reduce the chance of forgetting something when the conditions begin to move quickly.
Before You Pack Up
Before taking the camera off the tripod, I make one final check.
-
Is the Milky Way in the strongest position within the composition?
-
Are the stars properly focused?
-
Is the shutter speed short enough for the amount of star movement I am willing to accept?
-
Do I have at least one complete exposure of the scene?
-
Is the foreground sharp where it needs to be?
-
Have I recorded enough foreground detail?
-
If I am stacking, do I have a complete and consistent sequence?
-
If I am using a tracker, do I also have an untracked reference exposure?
-
Have I checked the edges and corners of the frame?
-
Is there anything happening now that was not part of the original plan but may produce a more interesting photograph?
I also make one extra exposure whenever possible. It costs almost nothing, and equipment can be packed away only once.
By this point, the final photograph may exist in a single file or across several exposures. Either way, the essential work has been completed in the field. The location, the position of the Milky Way, the light, the focus and the composition cannot be repaired convincingly later if they were never photographed properly in the first place.
Processing can refine what the camera recorded.
It cannot replace the moment.
Field Checklist
Before heading into the field, make sure you have:
Checked the moon phase
Planned the Milky Way in Photo Pills
Packed spare batteries
Download offline maps
Brought a headlamp
Scouted the location before sunset